คู่มือการใช้งาน เครื่องบันทึกภาพ NVR 2200 serie
Last updated: 10 มิ.ย. 2563 | 2548 จำนวนผู้เข้าชม |

![]()
User Guide for the
Hp-22B13&Hp-22B20
Hp-22D13&Hp-22D20
Target Audience
Administrators and Operators of Video Surveillance Products
Document Version
Version 00
Applicable Models
Hp-22B13 series, Hp-22B20 series, Hp-22D13 series and Hp-22D20 series
Related Document
Hp-22B13&Hp-22B20 Installation Guide
Hp-22D13&Hp-22D20 Installation Guide
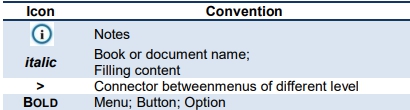
Convention
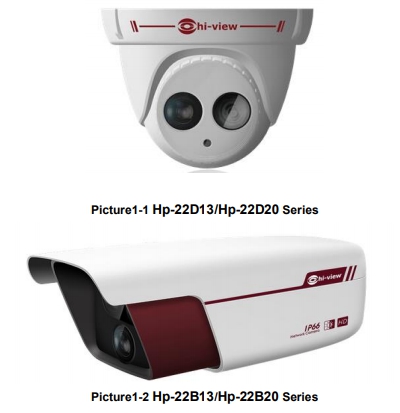
- Product Brief
HD IP Camera (hereinafter referred to as Camera) is a remote video surveillance device based on IP
network technology. It encodes and transmitsHD video. Also, itcan be deployed at any point of a
surveillance network and transmits videos via public or private IP network. The device has built-in IR
illumination module, which satisfies different video surveillance requirements better.
1.1 Appearance
1.2 Main Functions
Live View
Apply high-performance progressive scan sensor, with clear image and vivid color;
High-performance video processing chip and efficient video encoding, providing HD video;
Dual-stream to fit different network bandwidth;
Configurable text overlay on video
IRIllumination
Built-in IR illumination module to better satisfy different video surveillance requirements
HD IP Camera User Manual 2
Static address, DHCP or PPPoE;
NAT traversal, DNS and multicast technology
POE
PoE supported, realize network transmission and power supply only with a PoE switch
Camera Parameter Adjustable
Multiple camera parameters are adjustable to suit various surveillance requirements.
Motion Detection
User can set motion detection area in the surveillance scene. Once someone appears in the
defined area, the system will trigger alarm.
Privacy Mask
Keep sensitive information private.
ROI Encode
Only encode specific area to ensure normal surveillance and constant resolution of key area
under poor network.
Clipping Area Encode
Only encode specific area to ensure normal surveillance of key area under poor network.
User Management
Different permissions will be allocated to different accounts to ensure normal operation of
device.
2. Start Up
Please refer to the Quick Start Guide in the packing for device installation and wiring.
2.1 Client Installation Conditions
Requirements of PC for installing the client:
- Operating System: Windows XP or newer versions
- Browser: IE6.0 or newer versions
- Processor: 2.0 GHz CORE®2 series or other equivalent processors
- RAM Memory: 2GB or above
- DirectX:9.0c
2.2 Initial Configuration
1) Power on the camera after installing and wiring.
2) Get IPCSearch from the attached CD.
Note: IPCSearch is green software free from installation.
3) RunIPCSearch: it will search devices in LAN automatically and display the list as
shown in Picture 2-1.
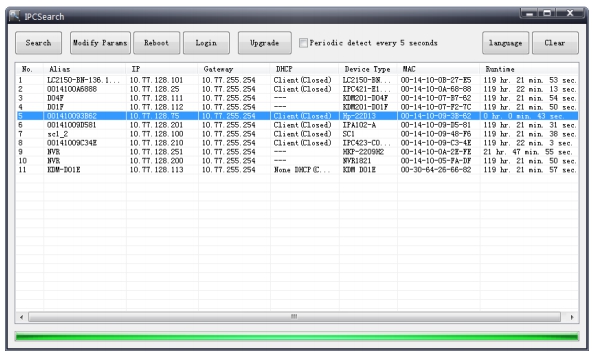
4) Select a camera to be configured, click Modify Paras or right click the mouse.
Interface is shown in Picture 2-2.
Interface is shown in Picture 2-2.


Picture2-3IPCCtrl Login Interface
6) Enter user name and password:
IPCCtrlaccountsconsist ofbothadmin and guest users: admin: can perform full operations. guest: can perform operations, for example, live video view, image search, video record search, video playback, etc. guest can neither configure parameters, delete videos or snapshots, nor operate user management or equipment maintenance.
7) Interface after login is shown in Picture 2-4.
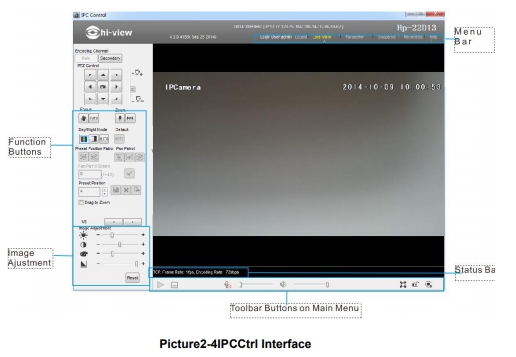
3. Product Functions
IPCCtrl can not only view live video, but also perform local snapshot and recording.
Note: Functions of different cameras may differ, and this Manual will take camera with more functions as
example. User operation is subject to the actual functions of the model. Disabled button in IPCCtrl
means the model doesn’t support the function.
3.1 Live View
The default interface after user login is live video view, or user can click Live View to enter the
interface.
3.1.1 Toolbar Buttons on Main Menu

1) PU Snapshot: PU Snapshots an image and sends it to local client in .JPG format. The image
quality is good, but there is some time delay caused by network.
2) Local Snapshot: Client snapshots an image and save it locally. The image quality is ordinary,
but there isn’t any time delay.
quality is good, but there is some time delay caused by network.
2) Local Snapshot: Client snapshots an image and save it locally. The image quality is ordinary,
but there isn’t any time delay.
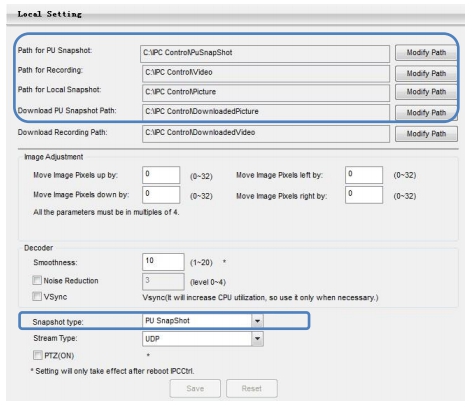
Picture3-2Snapshot Setting
User can set or modify save path for PU Snapshot and Local Snapshot in
Parameter>Local Setting, as shown in Picture 3-2.
Recording
Click this button to start recording and click again to stop recording. Recording is
saved on local PC. User can set or modify save path in Parameter>Local Setting.
3.1.2 Image Adjustment
3.1.2.1 Brightness
Due to low light situation, the image will look completely or partially dark and
hard to recognize. IPCCtrl provides the following functions to increase image
brightness and ensure surveillance quality.
Enable IR Lamp
In low light situation, IR lamp can be started to get better surveillance images.
Increase Image BrightneSS
In Image Adjustment part, user can drag Brightness slide bar to adjust image
brightness.
Or, enable Camera Mode to make camera transfer to preset value in a defined
period of time.
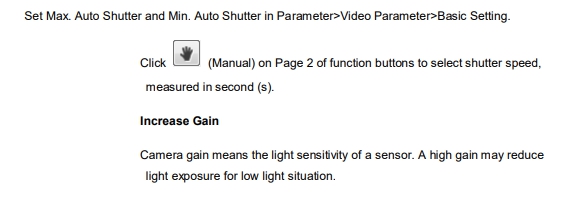
Slower Shutter Speed
Camera shutter speed means the cycle of the sensor calculating light input
amount. Therefore, the slower the speed is, the brighter the image is.
brightness.
Or, enable Camera Mode to make camera transfer to preset value in a defined
period of time.
Slower Shutter Speed
Camera shutter speed means the cycle of the sensor calculating light input
amount. Therefore, the slower the speed is, the brighter the image is.
3.1.2.2 White Balance Adjustment
The basic conception of White Balance is “to make all colors white regardless
of the color temperature of the light source”. It can compensate color rendition
in pictures taken in specific light source.
On Page 2 of function buttons, select White Balance Mode, Auto, Light or
Manual.
After selecting Manual, enter Red Gain and Blue Gain respectively to adjust
image colors.
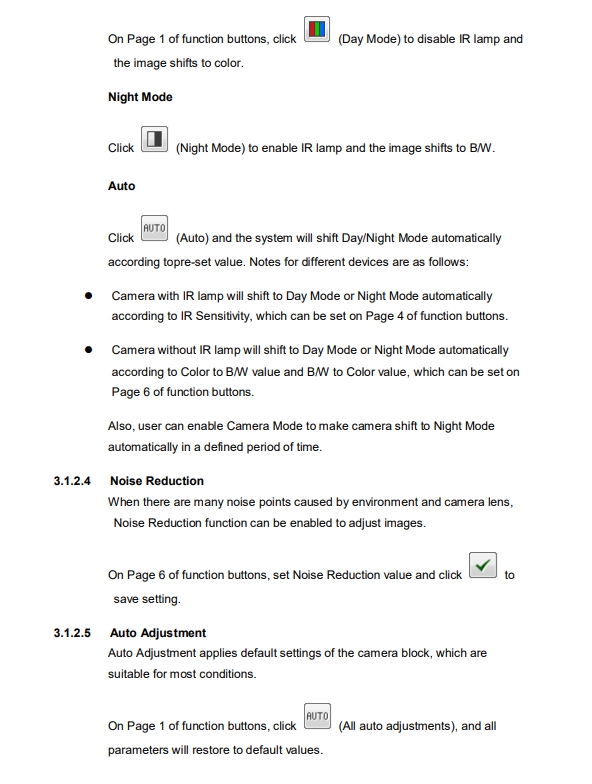
3.1.2.3 Day/Night Mode
Day (Night) Mode means disabling (enabling) IR lamp, and the image shifts to
color (B/W), thus to get optimal images for day (sufficient light source) and
night (insufficient light source) conditions.
Day (Night) Mode means disabling (enabling) IR lamp, and the image shifts to
color (B/W), thus to get optimal images for day (sufficient light source) and
night (insufficient light source) conditions.
Also, user can set Focus, Shutter and other parameter as Auto alone.
3.1.2.6 Video Freeze
On Page 5 of function buttons, select this function and the video will display the
last frame image before clicking. Click to disable freeze.
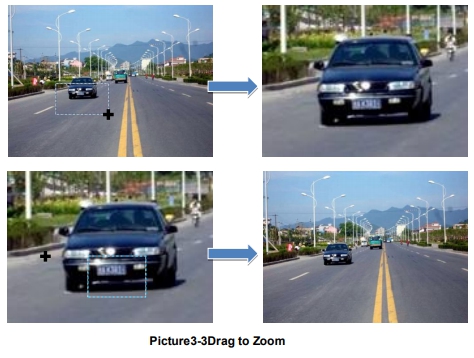
3.1.2.7 Drag to Zoom
Definition: Drag to Zoom function centers the selected area and zooms in the
area to full screen.
Enable:Right click the image and click Drag to Zoom on the popup menu to
enable the function; or check Drag to Zoom on the bottom of Page 1 of
function buttons.
Start:Drag an area (left to right) with mouse to zoom in and center it.
Cancel: Drag a reverse rectangle (right to left) with mouse to cancel zoom and
center.
Disable: Right click the image and click Drag to Zoom on the popup menu to
disable the function; or uncheck Drag to Zoom on the bottom of Page 1 of
function buttons.
3.1.2.6 Video Freeze
On Page 5 of function buttons, select this function and the video will display the
last frame image before clicking. Click to disable freeze.
3.1.2.7 Drag to Zoom
Definition: Drag to Zoom function centers the selected area and zooms in the
area to full screen.
Enable:Right click the image and click Drag to Zoom on the popup menu to
enable the function; or check Drag to Zoom on the bottom of Page 1 of
function buttons.
Start:Drag an area (left to right) with mouse to zoom in and center it.
Cancel: Drag a reverse rectangle (right to left) with mouse to cancel zoom and
center.
Disable: Right click the image and click Drag to Zoom on the popup menu to
disable the function; or uncheck Drag to Zoom on the bottom of Page 1 of
function buttons.
3.2 Motion Detection
Detect movements in the defined area. Once the movement exceeds the defined sensitivity,
an alarm will be triggered by IPCCtrl.
3.2.1 Set Area
Motion detection of Full Area and maximum 4 user-defined areas
Detect movements in the defined area. Once the movement exceeds the defined sensitivity,
an alarm will be triggered by IPCCtrl.
3.2.1 Set Area
Motion detection of Full Area and maximum 4 user-defined areas
1) Check Parameter>Video Parameter>Intelligent Alarm to set motion detection area.
2) Check Enable Intelligent Alarm, and select Motion Detection. Detection area can be
full area or specific area. If user selects specific area, the user should define
detection area on the below image.
3) Click a squareand it will turn purple red. Start from this square and draw an area to
be the detection area, which will turn purple red.
4) Click under the view window or click to reset the area.
3.2.2 Clear Area
Start from an undefined square and draw an area that contains the defined area, or
click the defined squares one by one to clear setting. Save to make settings
effective.
3.2.3 Disable Function
To disable this function, uncheck the checkbox Enable Intelligent Alarm.
3.3 Privacy Mask
Mask sensitive and private part of the image so as to keep sensitive information private.
3.3.1 Set Area
The image is divided into 16 columns and 12 rows of small squares. The maximum
masking area can be 24 squares. The maximum number of Privacy Mask area is
4.
1) Check Parameter>Video Parameter>Privacy Mask to set privacy mask area.
2) Check Enable Privacy Mask.
3) Click a square and it will turn purple red. Start from this square and draw an area to
be the masking area, which will turn purple red.
4) Click under the view window or click to reset the area.
3.3.2 Clear Area
Start from an undefined square and draw an area that contains the defined area, or
click the defined squares one by one to clear setting. Save to make settings
effective.
3.3.3 Disable Function
To disable this function, uncheck the checkbox Enable Privacy Mask.
3.4 Clipping Area Encode
After user defines the encoding area, the system will encode and display the clipping area
only, so as to save system resources and network bandwidth.
In the interface Parameter>Video Parameter>Clipping Area Encode, drag an area with
mouse, click under the view window or click to reset the area.
3.5 ROI Encode
Only encode specific area to ensure normal surveillance and constant resolution of key area
under poor network. The resolution of the area must be greater than 704×576 and less than
the current resolution.
In the interface Parameter>Video Parameter>ROI Encode, drag an area with mouse, click
under the view window or click to reset the area.
Note: When ROI Encode is enabled, if user modifies image resolution or aspect ratio (stand
screen/widescreen), the device will quit ROI Encode automatically.
3.6 *Snapshot
Click to enter snapshot management interface. User can perform operations on
snapshots in SD card, such as view, delete and download.
Note: If the Snapshot interface is disabled, please confirm the SD card is inserted and then reboot client.
Operation Steps
1) Search snapshots: search those pictures within the defined duration from the SD
card.
2) On the snapshot list, select searched picture and perform operations such as view,
delete and download.
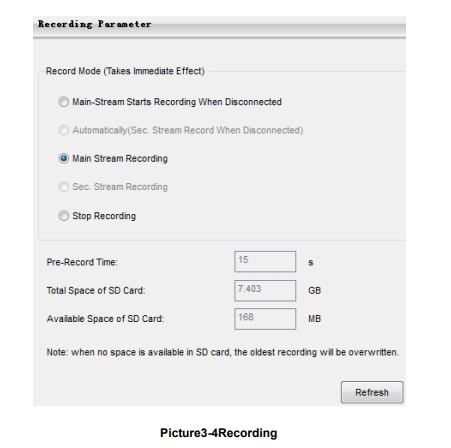
3.7 *Recording
Click to enter recording management interface. User can perform operations on
recordings in SD card, such as playback, delete and download. (A SD card must be inserted
in the camera.)
Note: If the Recording interface is disabled, please confirm the SD card is inserted and then reboot client.
Note: Record Modeincludes:Start Recording When Disconnected, Recording All the Time, and Stop
Recording, configurable in Parameter>Recording Parameter.
mouse, click under the view window or click to reset the area.
3.5 ROI Encode
Only encode specific area to ensure normal surveillance and constant resolution of key area
under poor network. The resolution of the area must be greater than 704×576 and less than
the current resolution.
In the interface Parameter>Video Parameter>ROI Encode, drag an area with mouse, click
under the view window or click to reset the area.
Note: When ROI Encode is enabled, if user modifies image resolution or aspect ratio (stand
screen/widescreen), the device will quit ROI Encode automatically.
3.6 *Snapshot
Click to enter snapshot management interface. User can perform operations on
snapshots in SD card, such as view, delete and download.
Note: If the Snapshot interface is disabled, please confirm the SD card is inserted and then reboot client.
Operation Steps
1) Search snapshots: search those pictures within the defined duration from the SD
card.
2) On the snapshot list, select searched picture and perform operations such as view,
delete and download.
3.7 *Recording
Click to enter recording management interface. User can perform operations on
recordings in SD card, such as playback, delete and download. (A SD card must be inserted
in the camera.)
Note: If the Recording interface is disabled, please confirm the SD card is inserted and then reboot client.
Note: Record Modeincludes:Start Recording When Disconnected, Recording All the Time, and Stop
Recording, configurable in Parameter>Recording Parameter.
3.7.1 Playback
1) Select Recording Duration from Calendar.
2) If there is background color on a date, it means there is recording on that day.
Select duration of the date and the video will be displayed directly in the right
window.
3.7.2 Download
Select Recording Duration from calendar and download recording to local PC,
download path configurable.
3.8 Upgrade
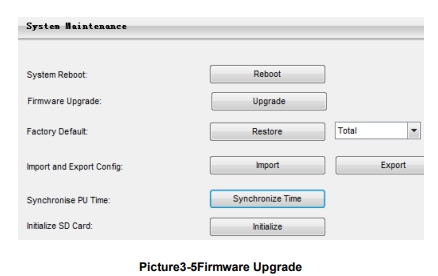
3.8.1 Firmware Upgrade
Contact dealer for upgrade file.
Method1
1) Enter IPCCtrl interface Parameter>System Maintenance> Upgrade, as shown in
Picture 3-5.
1) Select Recording Duration from Calendar.
2) If there is background color on a date, it means there is recording on that day.
Select duration of the date and the video will be displayed directly in the right
window.
3.7.2 Download
Select Recording Duration from calendar and download recording to local PC,
download path configurable.
3.8 Upgrade
3.8.1 Firmware Upgrade
Contact dealer for upgrade file.
Method1
1) Enter IPCCtrl interface Parameter>System Maintenance> Upgrade, as shown in
Picture 3-5.
Picture3-5Firmware Upgrade
2) Select local upgrade file (<*.pkg> or <*.img> format).
3) During upgrading, please do nothing but waiting. 4) After upgrading, please download ActiveX control again. After finishing it, reboot browser. Note: Please click “Upgrade” during system upgrading, and the upgrade file is usually in <*.pkg> or <*.img> format. Method2
1) RunIPCSearch.
2) Click to upgrade firmware of cameras of the same model simultaneously.
3.8.2 IPCCtrlUpgrade After firmware upgrade, please login web client again. The page will prompt to download a new ActiveX control. After downloading it, client upgrade will be completed. Login again to enter the latest IPCCtrl. Note: For detailed operation instructions of IPCCtrl, please refer to the help document.
4. Parameter
4.1 Network Access
2.2 Initial Configuration has introduced how to modify parameters via IPCSearch to make
camera access network. Camera accepts multiple network access methods (via Ethernet and
PPPoE). The following introduces how to configure camera network parameters in IPCCtrl.
4.1.1 Ethernet
Open Parameter>Network Setting>Ethernet Parameter, as shown in Picture 4-1 to
configure IP address, subnet mask and default gateway.

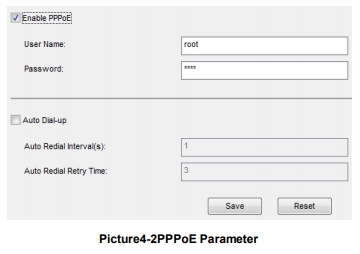
4.1.2 PPPoE
Open Parameter>Network Setting>PPPOEParameter, as shown in Picture 4-2 to
enter user name and password, and save.
Open Parameter>Network Setting>PPPOEParameter, as shown in Picture 4-2 to
enter user name and password, and save.
4.2 Register to VMS
OpenParameter>System Setting>Register to VMS as shown in Picture 4-3 to enter VMS
address and port. Save settings and reboot device.
OpenParameter>System Setting>Register to VMS as shown in Picture 4-3 to enter VMS
address and port. Save settings and reboot device.

4.3 *BNC Output
Camera with BNC output can output analog image directly when local display function is
enabled.
Open Parameter>Video Parameter>Camera Parameter, select ‘Start’ from the BNC Output
drop-down list and set the CVBS Video Mode, as shown below.
Camera with BNC output can output analog image directly when local display function is
enabled.
Open Parameter>Video Parameter>Camera Parameter, select ‘Start’ from the BNC Output
drop-down list and set the CVBS Video Mode, as shown below.

4.4 User Management
Admin user has the authorization to modify passwords of IPCCtrl admin user and guest user.
Modification method:
1) Open Parameter>System Setting>User Management
2) Check the checkbox of the item to be modified, the password area will be
enabled and editable.
3) Enter new password.
4) Confirm new password.
5) Click Save to validate setting, and Reset to quit modification.
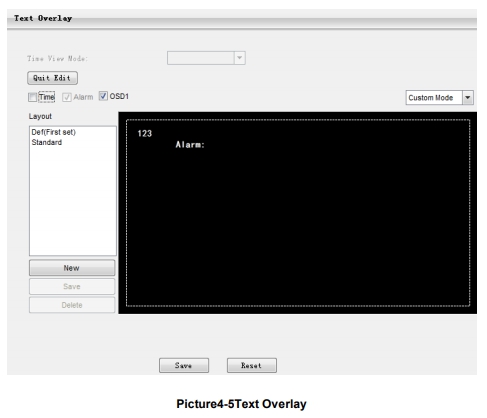
4.5 Text Overlay
Display preset text on the surveillance window, configuration steps as follows:
1) Open Parameter>Video Parameter>Text Overlay
2) Check Edit Text checkbox, as Picture 4-5 shows.
3) User can create and save multiple OSD layouts. Click Create and input layout name.
Select this layout from the list and edit it.
4) Check text types to be overlaid, time and user-defined OSD selectable.
Note: Different models may support different numbers of OSD. Configuration is subject to actual camera
model.
5) Double click user-defined OSD to input text content. Each OSD supports maximally
3 lines of text. User can check Align Right checkbox to align texts on the right, or
the default setting is “align left”.
6) Drag text to the ideal position in the view window.
7) Click Save to validate settings, and Reset to quit edit
Admin user has the authorization to modify passwords of IPCCtrl admin user and guest user.
Modification method:
1) Open Parameter>System Setting>User Management
2) Check the checkbox of the item to be modified, the password area will be
enabled and editable.
3) Enter new password.
4) Confirm new password.
5) Click Save to validate setting, and Reset to quit modification.
4.5 Text Overlay
Display preset text on the surveillance window, configuration steps as follows:
1) Open Parameter>Video Parameter>Text Overlay
2) Check Edit Text checkbox, as Picture 4-5 shows.
3) User can create and save multiple OSD layouts. Click Create and input layout name.
Select this layout from the list and edit it.
4) Check text types to be overlaid, time and user-defined OSD selectable.
Note: Different models may support different numbers of OSD. Configuration is subject to actual camera
model.
5) Double click user-defined OSD to input text content. Each OSD supports maximally
3 lines of text. User can check Align Right checkbox to align texts on the right, or
the default setting is “align left”.
6) Drag text to the ideal position in the view window.
7) Click Save to validate settings, and Reset to quit edit
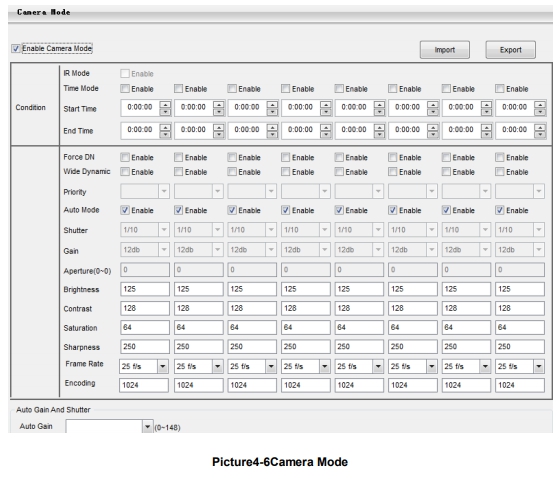
4.6 Camera Mode
Open path: Parameter>Video Parameter>Camera Mode
After enabling Camera Mode, user can define maximally 8 different non-overlapping
durations, and all parameters will be adjusted to the preset values automatically.
4.6.1 Configure Parameter
4.6.1.1 Night Mode
After enabling this function, device will shift toNight Mode in the defined
duration automatically. The IR lamp will be enabled and the image will turn
B/W.
4.6.1.2 Shutter, Gain, Auto
Shutter and Gain values configurable
Or enable Auto mode to apply set Shutter and Gain automatically.
4.6.1.3 Brightness, Contrast, Saturation, Sharpness
Brightness, Contrast, Saturation and Sharpness values configurable
Brightness, Contrast, Saturation and Sharpness range: 0-255.
4.6.1.4 Frame Rate, Encoding Rate
Frame Rate and Encoding Rate configurable
4.6.2 Import/Export Configuration
After completing configuration of camera mode, click to export and save
the configuration; click to import local configuration file instead of
manual configuration.
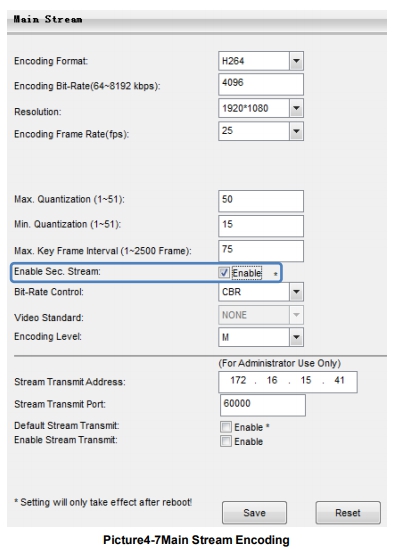
4.7 Dual-Stream
Camera supports dual-stream encoding. Dual-stream means the same video source is
encoded in 2 streams of video with different resolutions. User can select different resolution to
view or record according to the bandwidth conditions.
Open Parameter>Video Parameter>Main Stream Encode, as shown in Picture 4-7 to check
Enable Sec. Stream checkbox. After enabling, user can configure secondary stream
parameters in Parameter>Video Parameter>Secondary Stream Encode.
After completing configuration of camera mode, click to export and save
the configuration; click to import local configuration file instead of
manual configuration.
4.7 Dual-Stream
Camera supports dual-stream encoding. Dual-stream means the same video source is
encoded in 2 streams of video with different resolutions. User can select different resolution to
view or record according to the bandwidth conditions.
Open Parameter>Video Parameter>Main Stream Encode, as shown in Picture 4-7 to check
Enable Sec. Stream checkbox. After enabling, user can configure secondary stream
parameters in Parameter>Video Parameter>Secondary Stream Encode.
เนื้อหาที่เกี่ยวข้อง

คู่มือการใช้งาน เครื่องบันทึกภาพ NVR WIFI KIT 3
24 ก.ค. 2562

คู่มือการใช้งาน เครื่องบันทึกภาพ NVR 9700 serie
24 ก.ค. 2562

คู่มือการใช้งาน เครื่องบันทึกภาพ NVR 8000 serie
24 ก.ค. 2562

คู่มือการใช้งาน เครื่องบันทึกภาพ Hiview
24 ก.ค. 2562
Powered by
MakeWebEasy.com